Leica Cyclone Advanced Registration – Georeferencing
Welcome to the second three-part video series. Looking at more advanced registration concepts in Leica Cyclone. You can download the Cyclone database used in this video series by clicking on the link in the video description.
Georeferencing
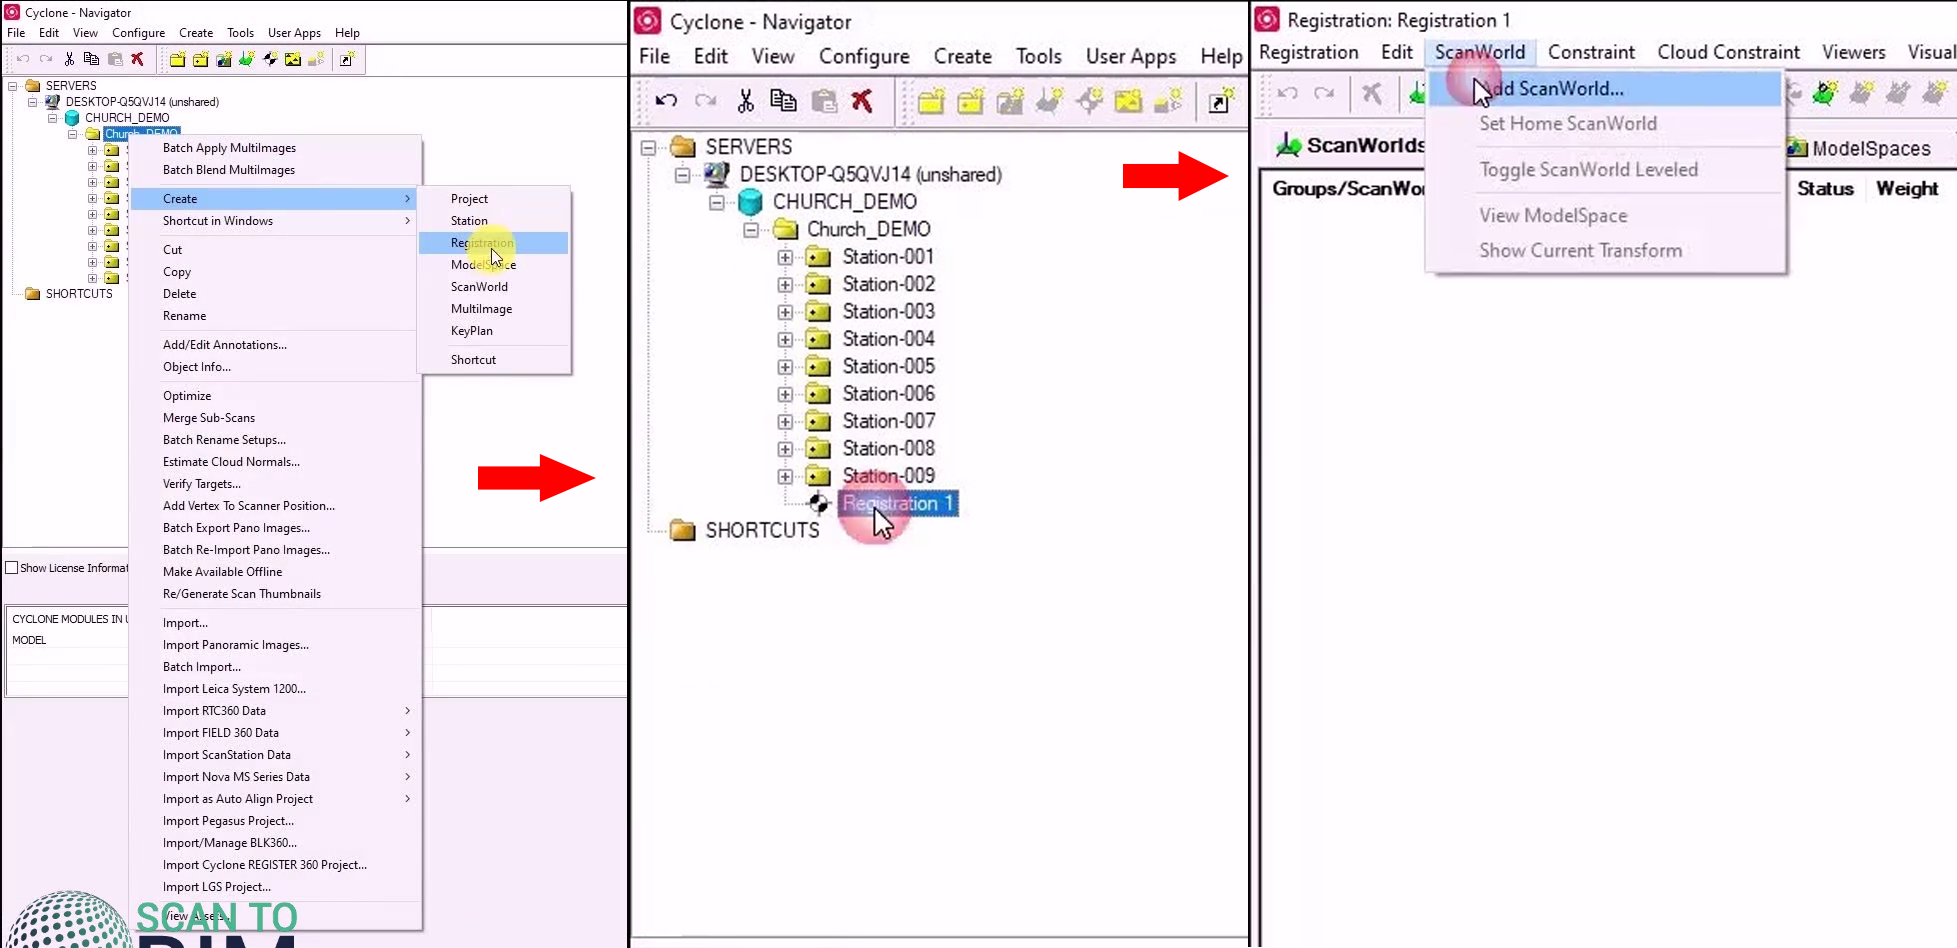
In this tutorial, we will look at how to register the point cloud data to a coordinate system. This process is known as geo-referencing, we have seen in our previous tutorials how to register scan worlds together, using both target and cloud-based constraints. In the video description, you will find a link to those tutorials. And the sample data set that was supplied. We’re going to pick up where we left off. We’ve run Cyclone and load the church demo data set. If you have any existing registration from the previous tutorial, delete that. And we’re going to re-register the scans. Let’s create a new registration. We will add all of the scans at once. Also, add our constraints and register the data.
Now if we sort by error, we can see that we have a large error at PSS03 is between stations two and one. I’m going to disable that constraint. And register again and see that again, now the biggest error is also between involving scan world nine systems it’s between scan world three and scans world nine. I’m going to disable that constraint as well, and register again. if we look at the error, we can see that most of the error is in the Z direction. And there’s an explanation for why this target needs to be disabled. PSS, oh three was accidentally knocked by a member of the public during the scanning process and had to be reset in place and re-leveled. before we move on to geo-referencing our data, just going to have a quick look at the interim results.
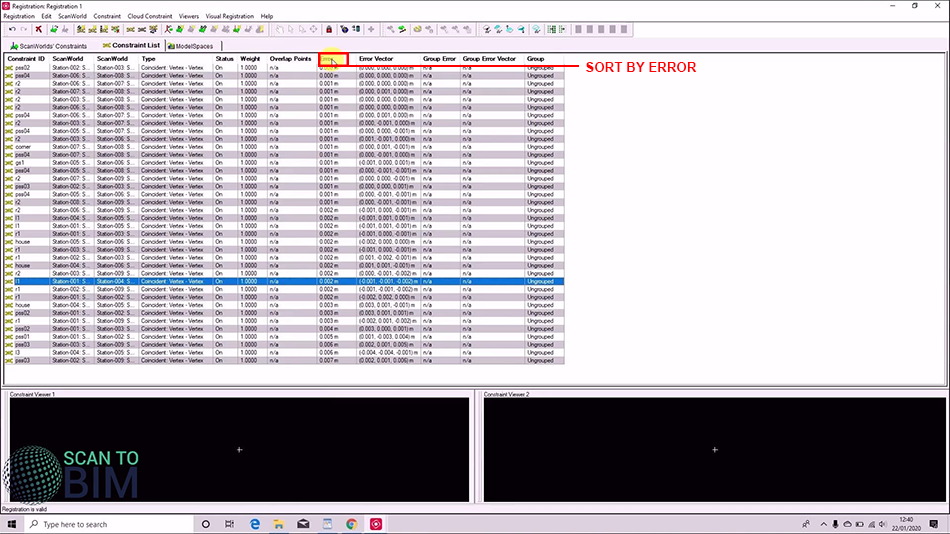
We will add all of the scans at once. Also, add our constraints and register the data. Now if we sort by error, we can see that we have a large error at PSS03 is between stations two and one. I’m going to disable that constraint. And register again and see that again, now the biggest error is also between involving scan world nine systems it’s between scan world three and scans world nine. I’m going to disable that constraint as well, and register again. if we look at the error, we can see that most of the error is in the Z direction. And there’s an explanation for why this target needs to be disabled. PSS, oh three was accidentally knocked by a member of the public during the scanning process and had to be reset in place and re-leveled. before we move on to geo-referencing our data, just going to have a quick look at the interim results.

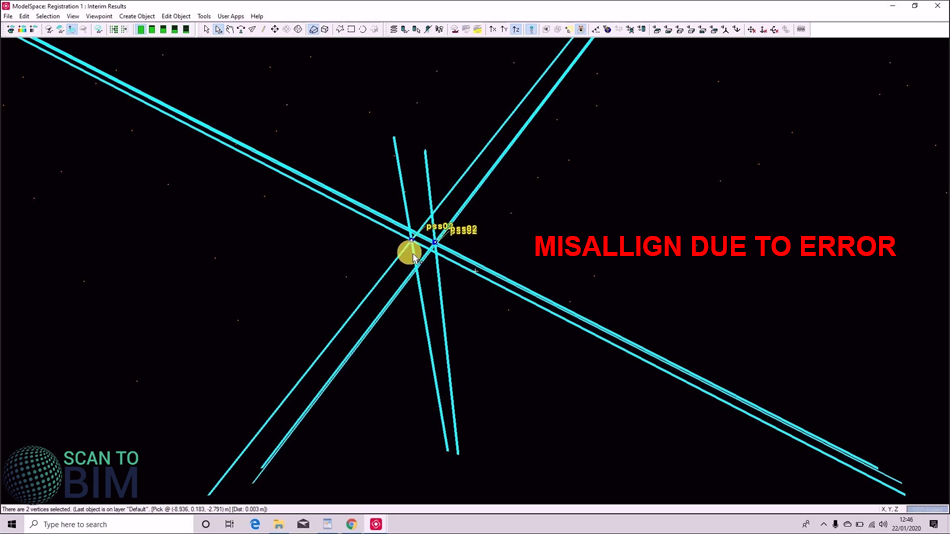
And we’re going to look at one of the targets PSS02, I think you’ll notice straight away that the target heights been applied the target’s vertex is no longer in the center of the target. It’s on the floor directly beneath hopefully on the nail. But here you can see that we have numerous positions for that third text. And that’s where the scans have been joined. And we’ve got a slight difference discrepancy between the scan words. if we measure for example, between those two points, can see down here tells you the distance is three millimeters. then to close that I don’t want to save the temporary space. And you can see that appears that we have discrepancies of around the three millimeters which were reported. If we were to go ahead now and Freesat registration, creating the model space. You’ll notice if we open the control space for that registration, that we no longer have numerous vertexes for PSS02 even though scanned in multiple scan words. This is because when you freeze the registration, it will create a single means position for that target.
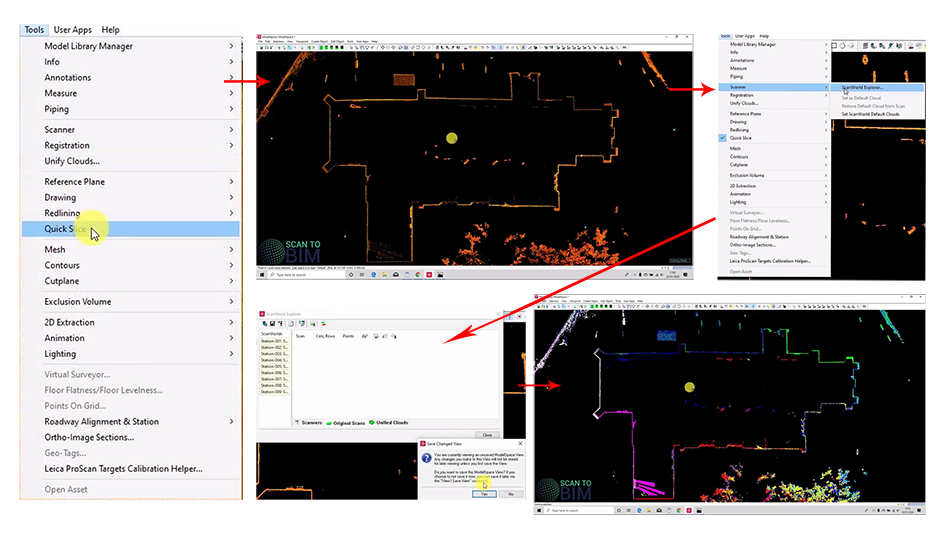
if we close our control space and open our model space view, the data is correctly registered. You would normally check that with the limit box. But I just wanted to show you a quick way of verifying that the data is registered, you can click a point and go to tools quick slice and Cyclone will automatically create that slice for you. And then you would colorize the scans individually.
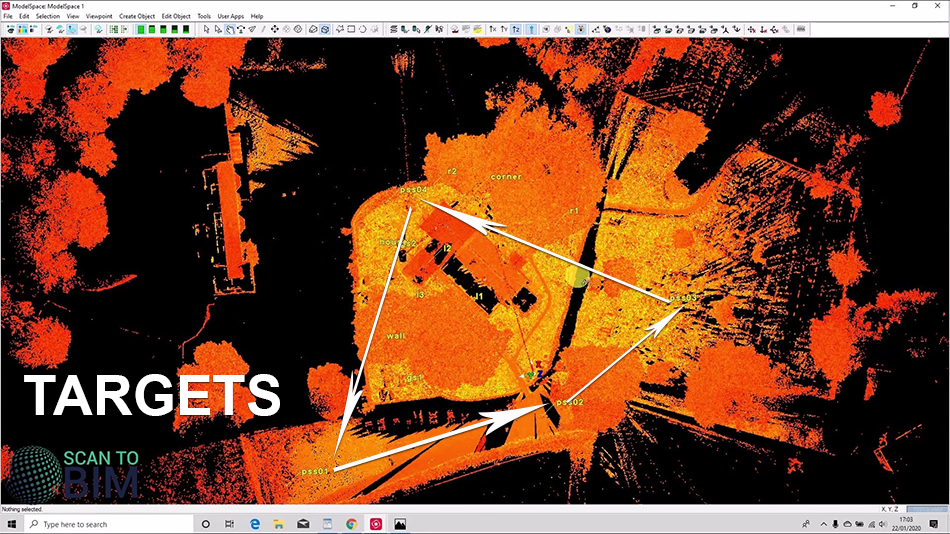
Go in and check that the alignment is correct, we can turn that off. Now in our previous tutorial, we discussed how targets should be ideally situated in a wide triangular formation. And this is true of the targets that we’ll use to coordinate the scan data. the target should be ideally placed with a large aspect ratio such as a large non-equilateral triangle or a wide rectangle. What we can see here is that we’ve got PSS1, 4, and, 3 for a really big triangle, and we’ve also got PSS2 here, you can register with just three targets. Depending on the size of your job, I always recommend using some redundant targets.
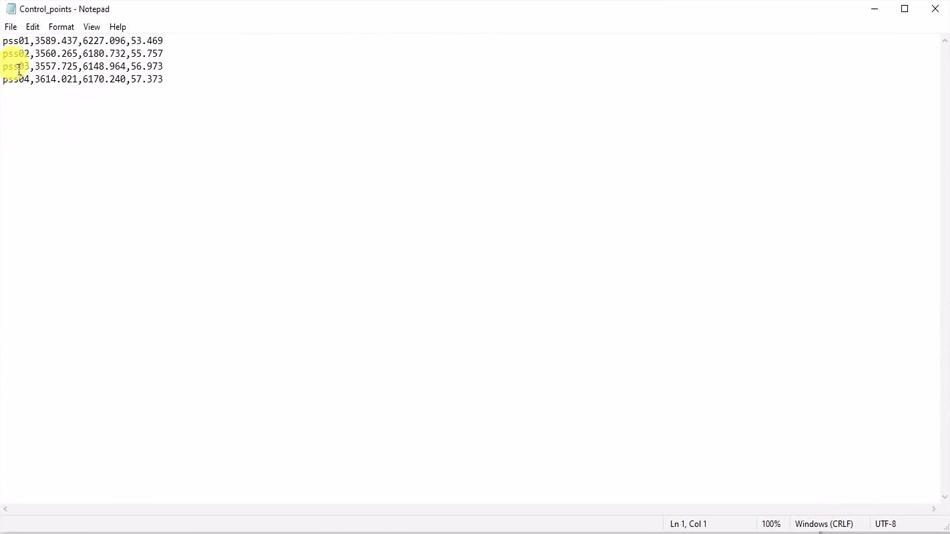
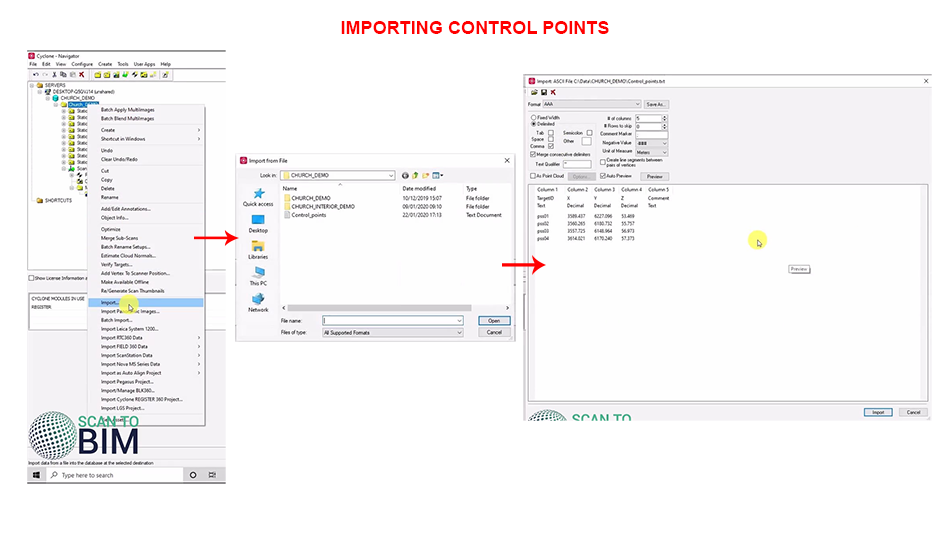
In our data sets, the surveyor in the field is recorded, the Target ID and the height of the targets also been established. In our case, the survey control points were leveled and coordinated to a local grid using a total station. And looking at our registered data set. We’ve got those four points established in a good geometry. And then close that window now and look at the control file. if we pop open file explorer, we can see our control points txt file, we can see we’ve got Target ID, easting, northing, and height. And we can see that the data is comma-separated. Now your control point file could also be tab-separated or space-separated. If we copy those file paths, switch back to Cyclone. And we can import the control file. And you can see that here we’ve got some defaults one’s called control format, and that is set up to be comma-separated. You could also have a semicolon-separated tab or space or even enter your own definition.
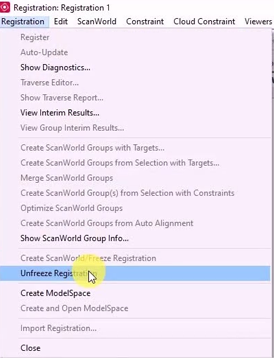
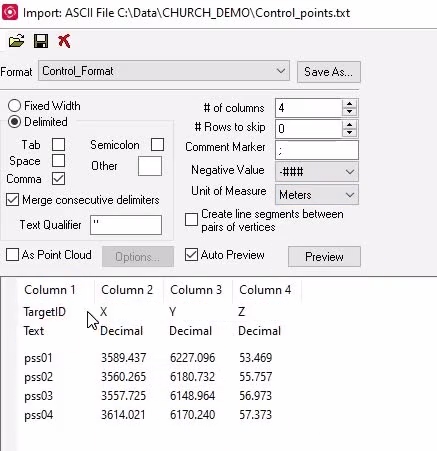 Our data has been imported in meters. But if you’re working in the US, we might want to change that foot. And you can see here that the columns are labeled Target ID easting, northing, and height. that’s all going to import correctly. Go ahead and do that. Just as a brief aside, should you be working in feet or other different units, go to Edit preferences and change the units to feet to show you where that is edit preferences, and linear units, you can choose which units you’d like to use. We have enough control space, you’ll see the four targets in their positions. We’ve registered this data, but we would like to unregister it and add the controlling. if we delete the model space. And then open reopen the registration and see registration, unfreeze registration. Now we can add in our control points. This is treated as a scan weld, just like any other, we’ll right-click on that. And we’re actually going to make this our home scan well. That means that all the other scans will be registered onto the coordinates contained in this scanner, we’ll say auto-add constraints. And this time, we’re going to sort by scan world. As you can see, we’ve got some crazy residuals, we just need to register that data, Excellent! And you can see that we’ve got a very good fit. You’ll also remember that we disabled PSS 303 in scan mode nine we were going to disable that target, which actually has an error of five mm. And again, you can see it’s almost all in height where the target was not. we’ll just save that one and register. Now if we sorted by error, we can see that our worst error is just six mils at this one target here l three. All the other targets are four millimeters or better. Now if we create the scan mode, and open the model space, just create model space this way and open another space.
We’ll be able to see that the coordinates have changed. See now it’s on a much larger coordinate system. And if we orient our data see that we’re now on the local grid for the church the long edge of the building is aligned horizontally. That’s useful later when you’re drawing your elevations or sections because you can use these preset views. To help you draw those elevations by just make that box a bit thinner. You can see how that could work, I would usually export the data to a recap file and then bring it into AutoCAD to draw an elevation. However, you can take your high-resolution screenshots and do the tracing from the image export in AutoCAD, but that will be the subject of a separate tutorial.
We could rename our registration now to registration coordinated. Now, there is another way to register data as control. And this is called a nested registration. I’m going to show you that now, once again, we’re going to delete our model space. And we’re going to go back into the registration. And we’re going to unfreeze this registration, we’re going to do is remove the control points camera, just register with scan mode one as the home scan mode. This is back onto an arbitrary control system. we’re going to call that registration local. And just to show you if we open up sometimes cyclones throw up these messages and ignore that one. Just try again, and it will work. Now if we pick a point, you can see that we’ve got nonsensical coordinates just based on the 00 points of scan mode one. To perform a nested registration, and create a new registration, we can add in scan world. Local that we just made and control points. We can set the control points as the home scan mode. You can also add the constraints and hit register. The difference with a nested registration is that the control file is not having any effect on how the scans are registered together. Because the imported registration is fixed, or in cycling terminology frozen with a nested registration. We’re transforming our combined scan well onto the control points and nested registration access a good check on how well registered your database. For example, if you know that your control is very accurate, then any errors could be due to poor registration. Conversely, if you know that your registration is very tight, and you see errors, and this could indicate a bad control file.
Join us in part two, where we’ll be looking at using standard groups. subscribe to our newsletter to get notified when we release a new vid